최근 Kubernetes 클러스터 관리에 있어서 Rancher의 인기가 높아지고 있습니다. 이 글에서는 RKE2를 사용하여 Rancher를 설치하고 구성하는 방법을 상세히 설명합니다.
이 가이드는 Kubernetes 초보자도 쉽게 따라 할 수 있도록 구성되어 있습니다.

0. 설치 환경 (Environment)
설치 전 OS 환경을 확인합니다.
OS: Ubuntu 20.04.6 LTS
1. RKE2 설치 (Install)
1-1. 사전 작업 (Prerequisites)
Kubernetes의 안정적인 구동을 위해 Swap 메모리를 비활성화하고, 시스템 패키지를 최신화합니다.
# Swap Off
swapoff -a

# fstab 주석 처리 (영구 설정)
vim /etc/fstab
# /swap.img     none    swap    sw      0       0   <-- 주석(#) 처리
패키지 업데이트 및 방화벽 초기화를 진행합니다.
# 패키지 업데이트
apt-get update
apt-get upgrade -y
apt-get dist-upgrade -y

# 방화벽 해제 및 iptables 초기화
systemctl stop ufw && ufw disable && iptables -F
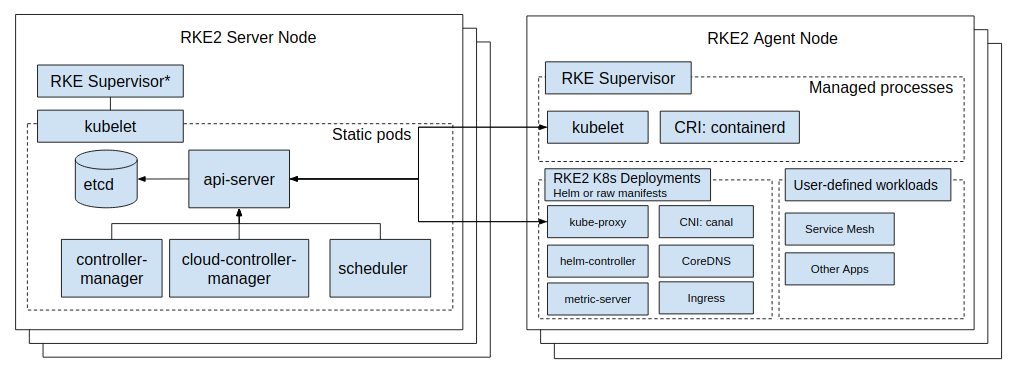
1-2. Master 1 노드 설치 (Initial Server)
첫 번째 마스터 노드를 구성합니다. 공식 스크립트를 통해 설치합니다.
# Latest 버전 설치
curl -sfL https://get.rke2.io | INSTALL_RKE2_TYPE="server" sh -

# (권장) 특정 버전 설치 (본 가이드 기준: v1.26.12+rke2r1)
curl -sfL https://get.rke2.io | INSTALL_RKE2_VERSION=v1.26.12+rke2r1 INSTALL_RKE2_TYPE="server" sh -
config.yaml 파일을 생성하여 tls-san 설정을 추가합니다. 이는 외부에서 클러스터에 접근하기 위한 IP 허용 목록입니다.
mkdir -p /etc/rancher/rke2
vim /etc/rancher/rke2/config.yaml
---
tls-san:
  - 192.168.31.171
  - 192.168.31.172
  - 192.168.31.173
  # ... (사용할 모든 노드 IP 및 VIP 추가)
---
서비스를 시작하고 Kubeconfig 및 crictl 환경변수를 설정합니다.
# 서비스 시작
systemctl enable rke2-server.service
systemctl start rke2-server.service

# kubectl 설정
mkdir ~/.kube/
cp /etc/rancher/rke2/rke2.yaml ~/.kube/config
export PATH=$PATH:/var/lib/rancher/rke2/bin/

# .bashrc에 등록 (영구 적용)
echo 'export PATH=/usr/local/bin:/var/lib/rancher/rke2/bin:$PATH' >> ~/.bashrc
echo "export KUBECONFIG=~/.kube/config" >> ~/.bashrc
source <(kubectl completion bash)
echo "source <(kubectl completion bash)" >> ~/.bashrc
echo "alias k=kubectl" >> ~/.bashrc
source ~/.bashrc

# crictl 설정
echo 'export CRI_CONFIG_FILE=/var/lib/rancher/rke2/agent/etc/crictl.yaml' >> ~/.bashrc
export CRI_CONFIG_FILE=/var/lib/rancher/rke2/agent/etc/crictl.yaml
1-3. Master 2/3 노드 설치 (HA Join)
고가용성(HA) 구성을 위해 추가 마스터 노드를 연결합니다. 먼저 Master 1 노드에서 토큰을 확인해야 합니다.
# [Master 1에서 실행] 토큰 확인
cat /var/lib/rancher/rke2/server/node-token
# 출력예시: K105db9dd6874dfd708f50693275ce8481c........
Master 2/3 노드에서 config.yaml을 작성할 때, 위에서 확인한 토큰과 Master 1의 주소를 입력합니다.
# [Master 2, 3에서 실행]
mkdir -p /etc/rancher/rke2
vim /etc/rancher/rke2/config.yaml
---
server: https://192.168.31.171:9345   # Master 1 IP
token: K105db9dd6874dfd708f50693275ce8481c... # 확인한 토큰값
tls-san:
  - 192.168.31.171
  - 192.168.31.172
  # ... (Master 1과 동일하게 작성)
---
이후 서비스 시작 및 환경변수 설정 과정은 Master 1과 동일하게 진행합니다.
1-4. Worker 노드 설치 (Agent)
워커 노드는 INSTALL_RKE2_TYPE="agent" 옵션으로 설치합니다.
# Agent 설치
curl -sfL https://get.rke2.io | INSTALL_RKE2_VERSION=v1.26.12+rke2r1 INSTALL_RKE2_TYPE="agent" sh -

# config.yaml 설정 (Master 2/3과 동일하게 server, token 입력)
# ...

# 서비스 시작
systemctl enable rke2-agent.service
systemctl start rke2-agent.service
2. Rancher 설치
2-1. Cert-manager 설치
Rancher는 보안 통신을 위해 TLS 인증서가 필수입니다. 이를 관리할 cert-manager를 설치합니다.
kubectl apply -f https://github.com/cert-manager/cert-manager/releases/download/v1.13.3/cert-manager.yaml

# 배포 상태 확인
kubectl -n cert-manager rollout status deploy/cert-manager
kubectl -n cert-manager rollout status deploy/cert-manager-webhook
2-2. Helm 및 Rancher 설치
Kubernetes 패키지 매니저인 Helm을 설치하고, Rancher 차트를 배포합니다.
# Helm 설치
curl -fsSL -o get_helm.sh https://raw.githubusercontent.com/helm/helm/master/scripts/get-helm-3
chmod 700 get_helm.sh
./get_helm.sh

# Rancher Repo 추가
helm repo add rancher-stable https://releases.rancher.com/server-charts/stable
helm repo update

# Namespace 생성 및 Rancher 설치
kubectl create namespace cattle-system

helm install rancher rancher-stable/rancher \
  --namespace cattle-system \
  --version 2.7.9 \
  --set hostname=rancher.com \
  --set replicas=1
2-3. 초기 비밀번호 확인 및 로그인
설치가 완료되면 로컬 PC의 /etc/hosts 파일에 Rancher IP와 도메인(rancher.com)을 매핑합니다. 그 후 브라우저로 접속합니다.
# 접속 주소
https://rancher.com
초기 Bootstrap Password는 아래 명령어로 확인합니다.
kubectl get secret --namespace cattle-system bootstrap-secret -o go-template='{{.data.bootstrapPassword|base64decode}}{{ "\n" }}'
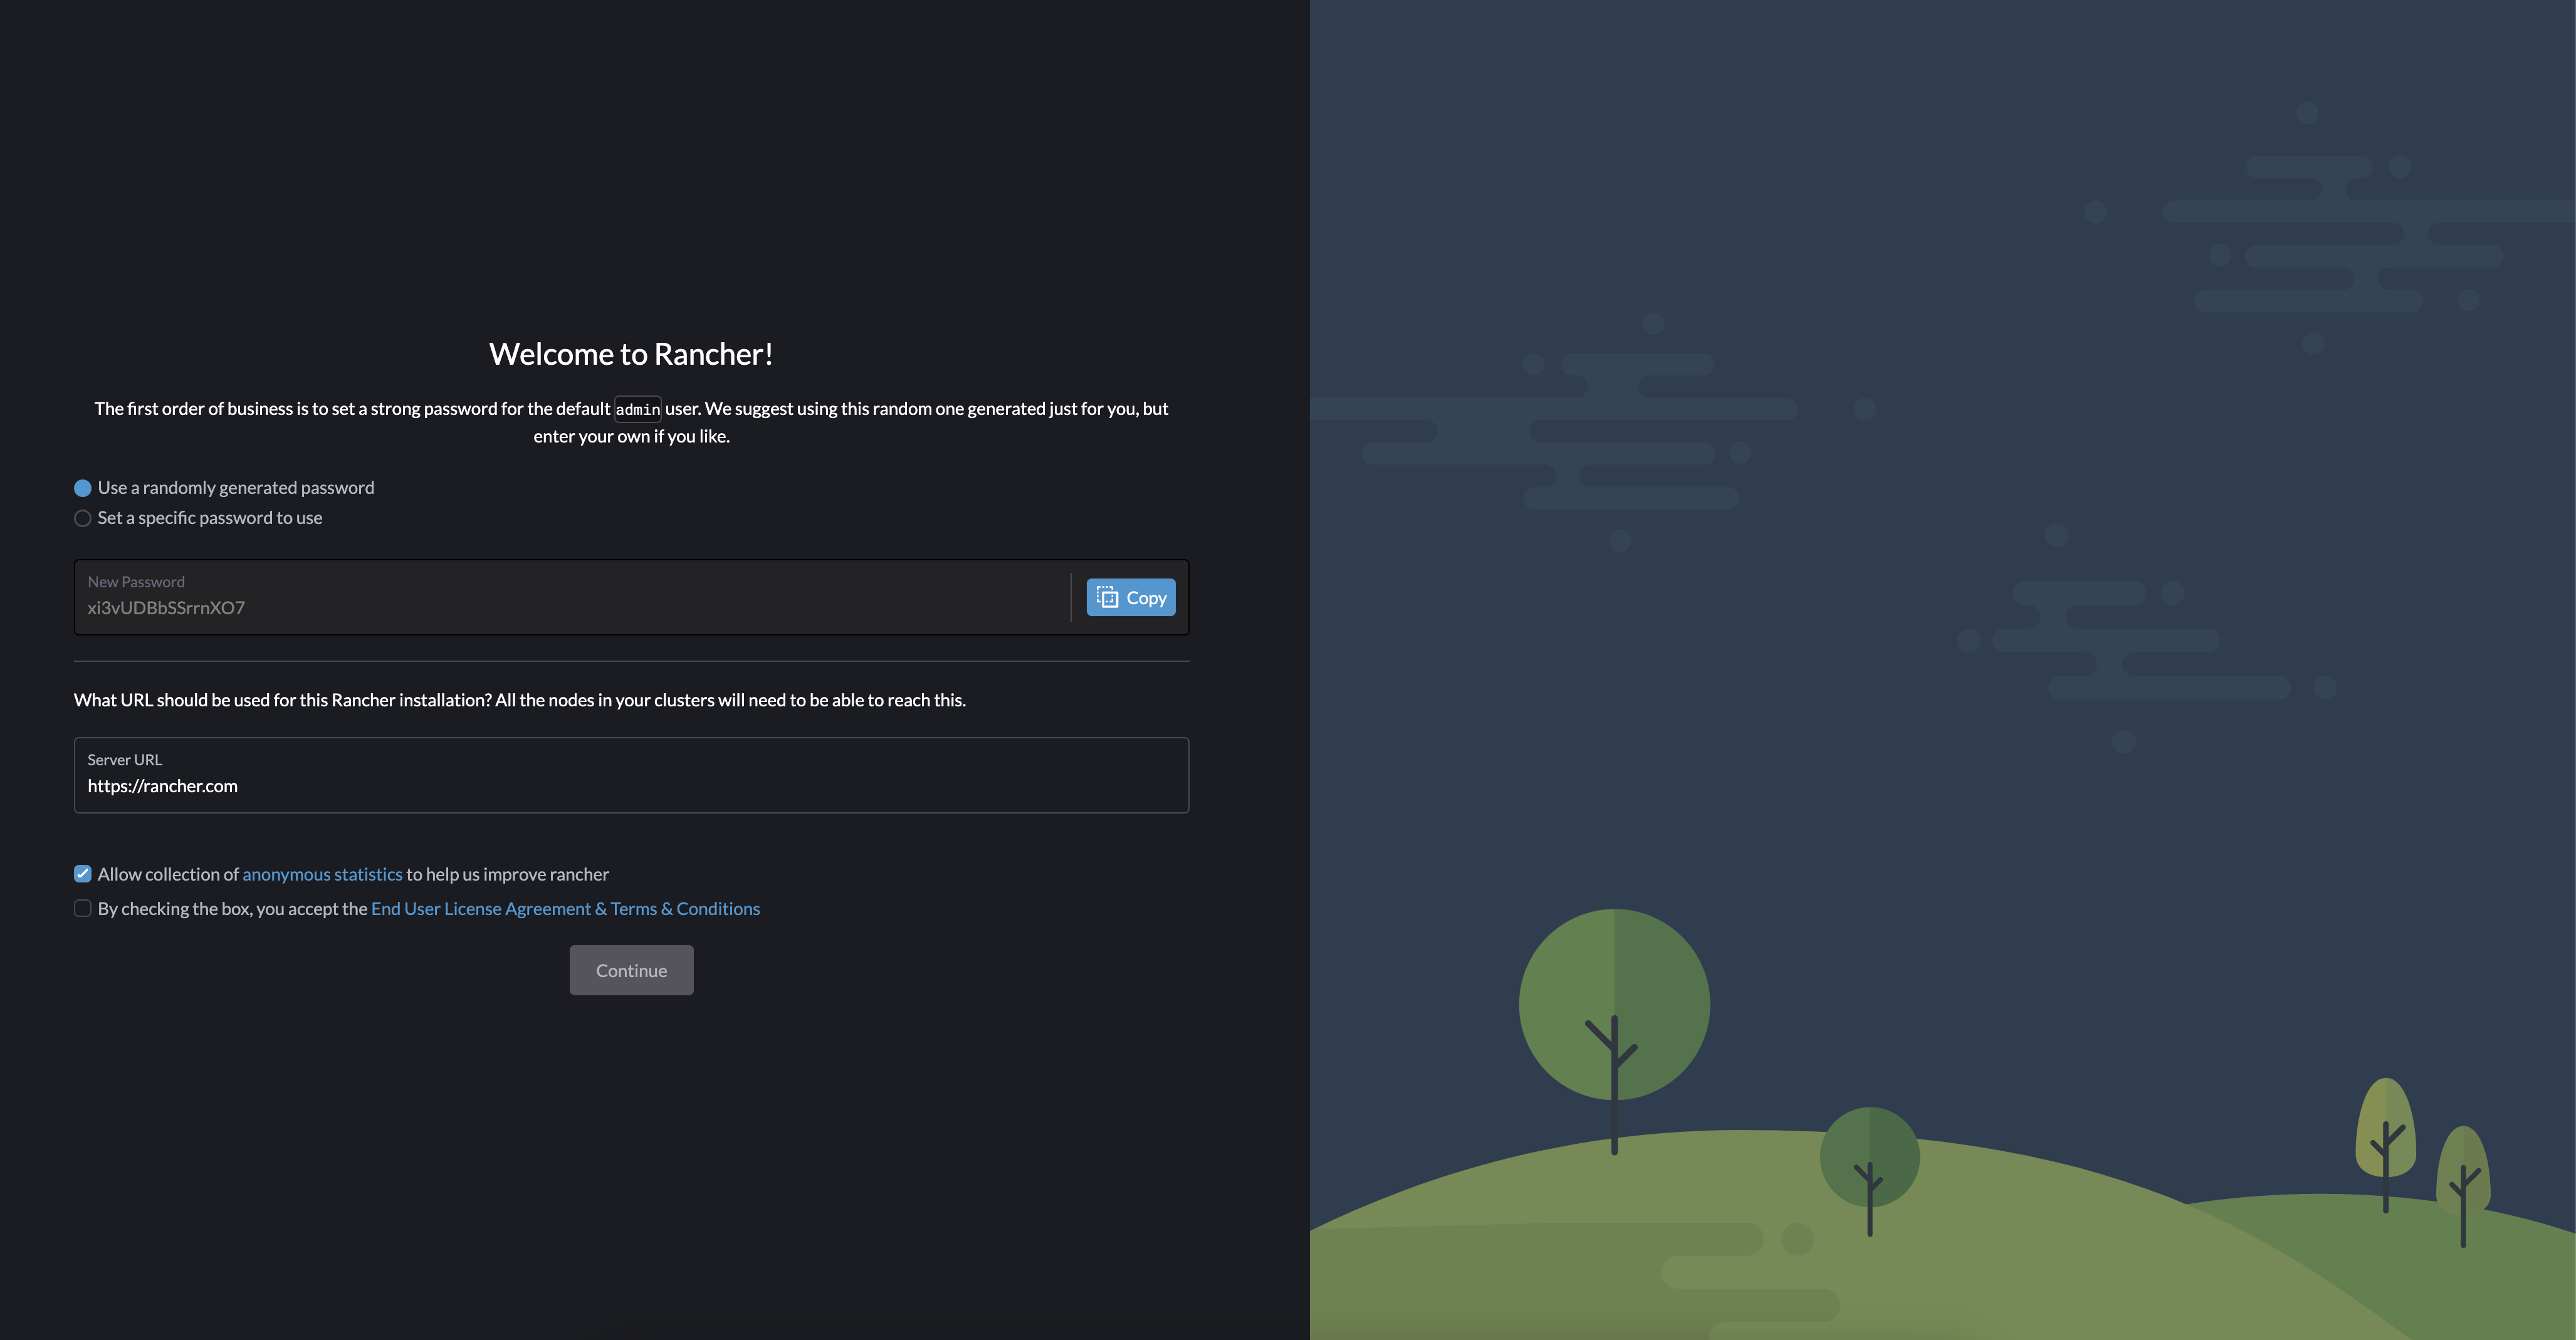
비밀번호를 입력하고 Log in Local User를 클릭한 뒤, 새로운 관리자 비밀번호를 설정하면 설치가 완료됩니다.

설치 완료 화면

3. 마무리
RKE2와 Rancher를 통해 강력하고 확장 가능한 Kubernetes 클러스터 환경을 구축했습니다. 이제 Rancher의 대시보드를 통해 클러스터 모니터링, 워크로드 관리, 보안 설정 등을 손쉽게 처리할 수 있습니다.
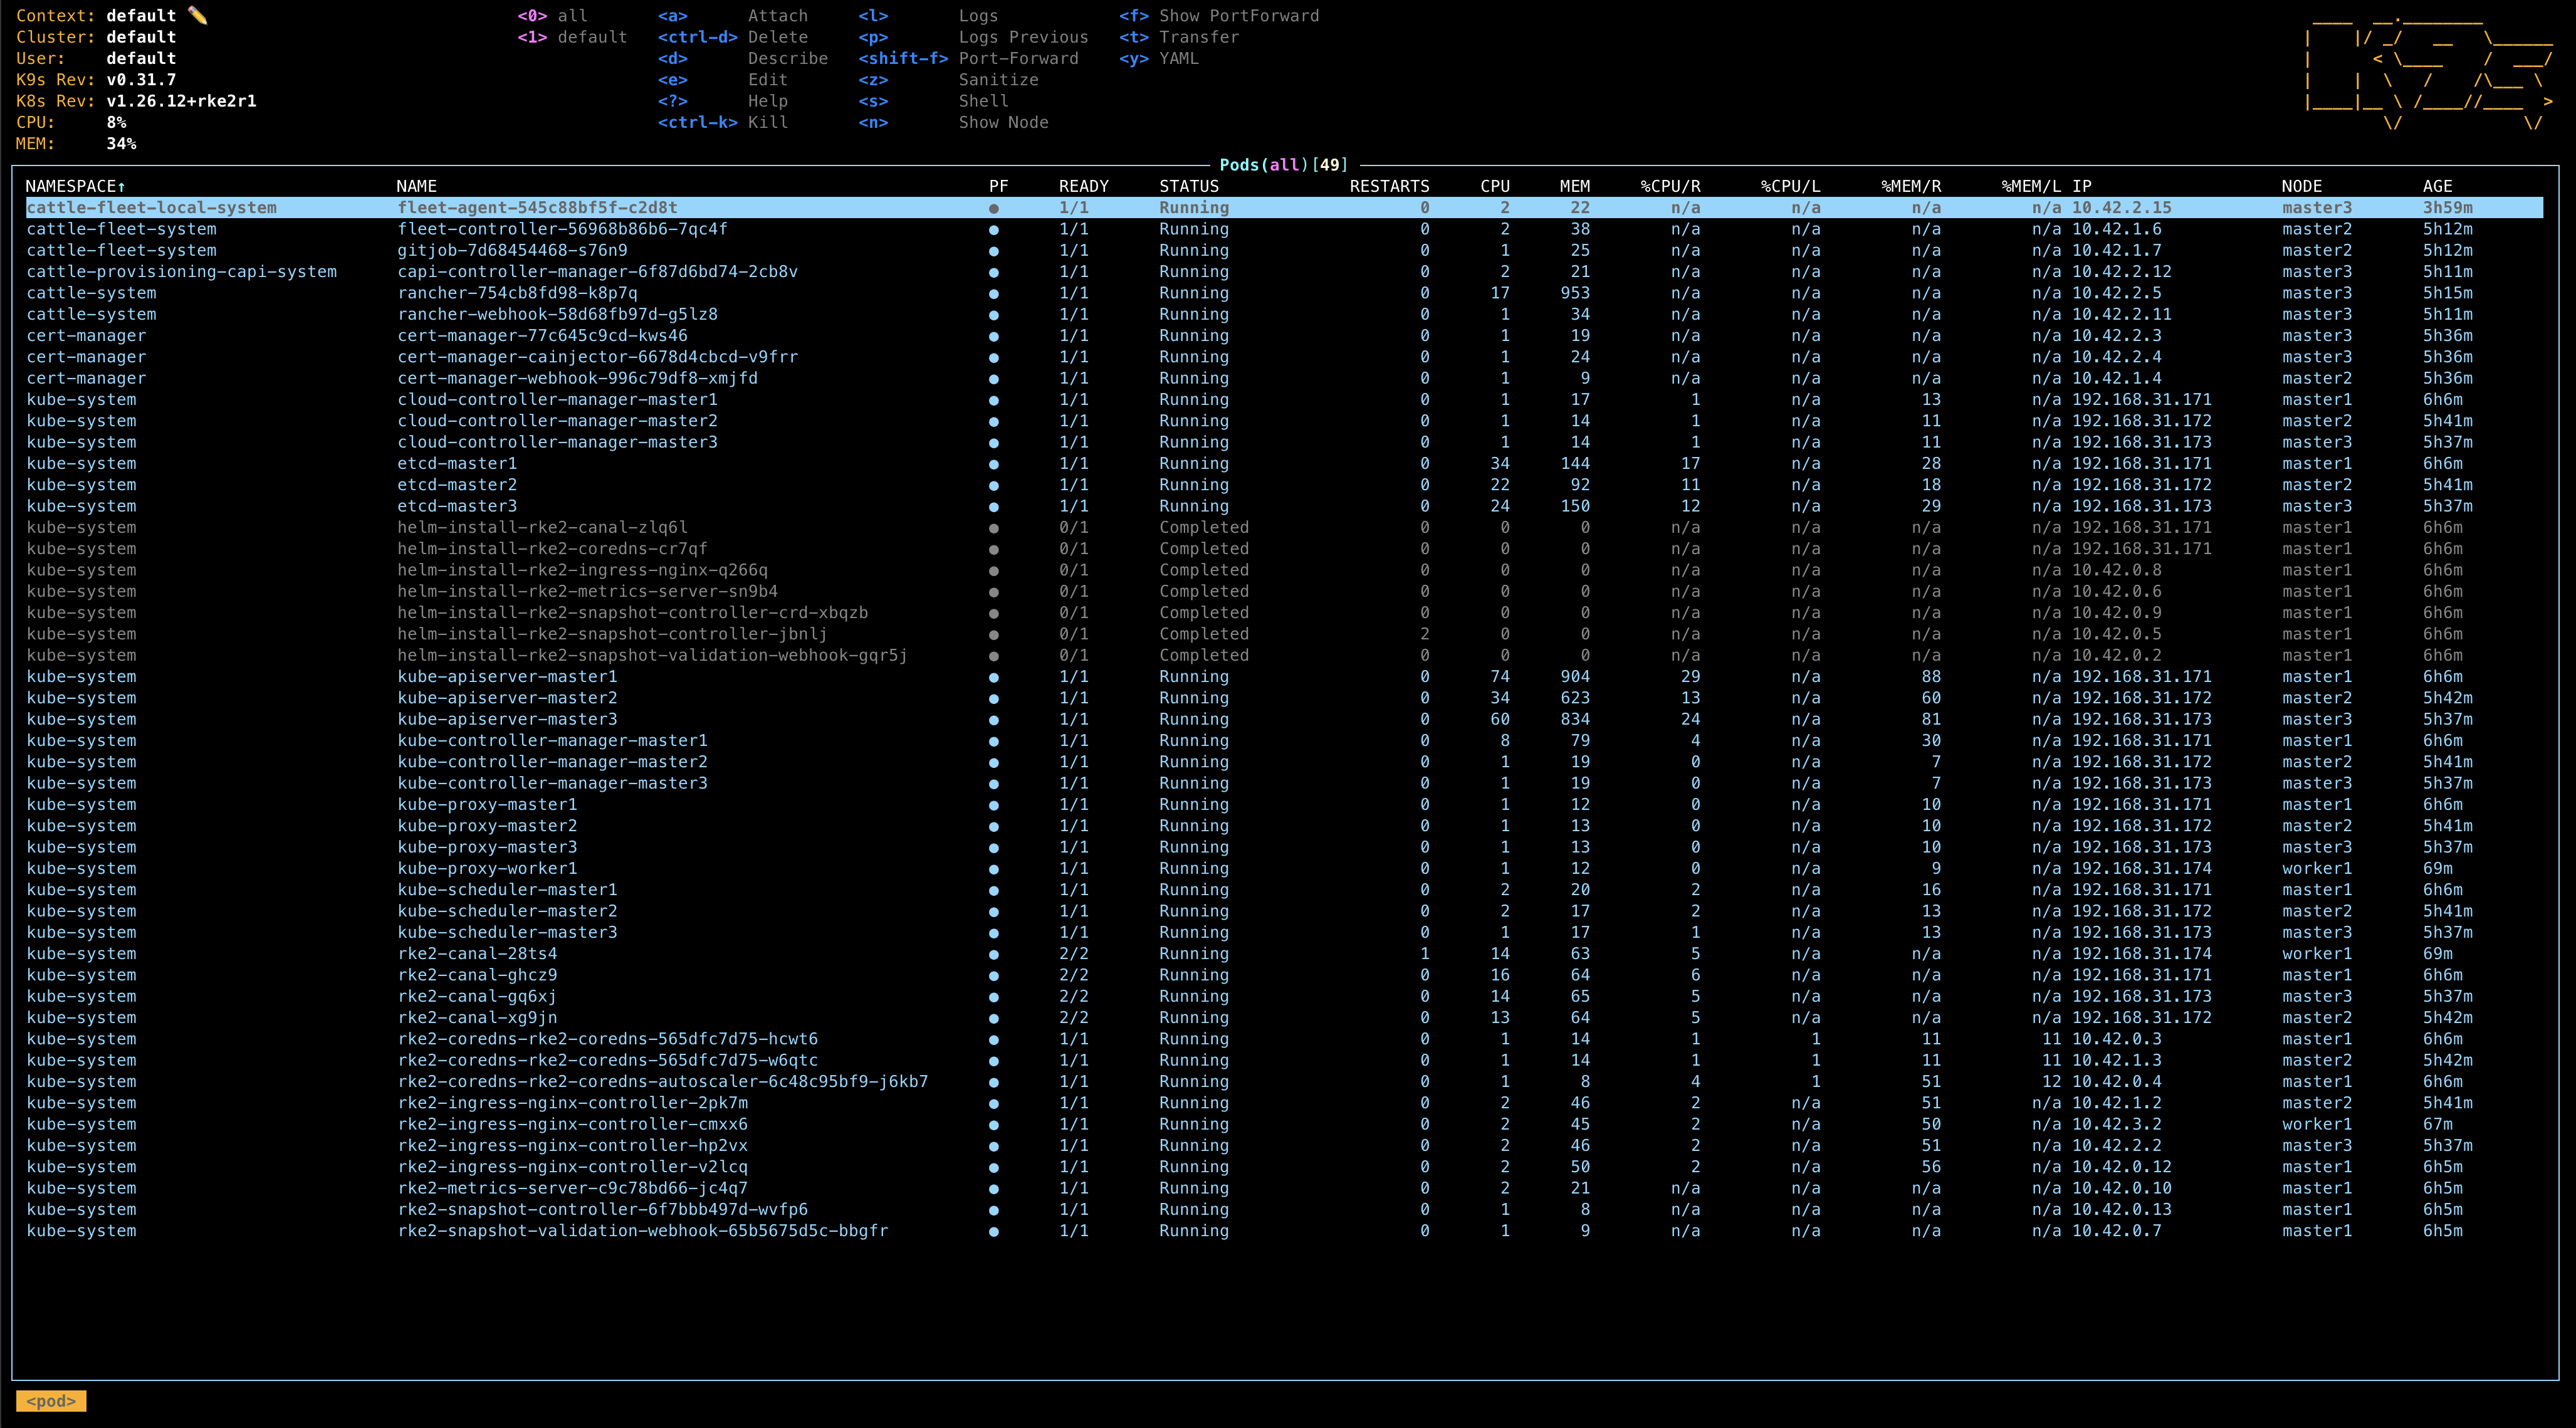
4. 부록: k9s 설치 (CLI Tool)
K9s는 터미널 기반의 강력한 Kubernetes 관리 도구입니다. CLI 환경에서 리소스를 직관적으로 모니터링할 수 있어 강력히 추천합니다.
# 다운로드 및 설치
wget https://github.com/derailed/k9s/releases/download/v0.31.7/k9s_Linux_amd64.tar.gz
tar zxvf k9s_Linux_amd64.tar.gz
chmod a+x k9s
mv k9s /usr/local/bin/

# 실행
k9s